Showing posts with label word wall. Show all posts

Printing 2 by 1 {Spelling Journals}

Hey guys! I thought I'd share a remake of my SPELLING JOURNALS

I've used these for YEARS. Honestly.  Truly a life saver. I used to send them to our district's print shop to get printed and bound, but over the years, I've started changing how I do them...


Now I print them 2 by 1 and then hole punch them and put them in a 3-pronged folder.

Just in case you need to know how to do it... here's a quick tutorial

First - hit that page thumbnail icon on the top left, so all the pages show up in the sidebar.


Then, hold down the control button and click on the pages you want to print. I happened to only want to print the pages with word banks already on there, but if you wanted both pages, that's cool, too!


Then click on the print icon up top.


THEN... here's where you need to make sure of a few things...
- click on "multiple"
- custom - 2 by 1
- horizontal (or vertical, whichever fits your pages)
- landscape

Then you print them up and hole punch


I print a cover sheet in a different color, so it stands out - since they use their folders for other things too. 


Check out how we use this spelling folder in THIS post. 


Find it in my TPT store HERE


58

Keeping Spelling Throughout the Year Organized!

I've had some good responses to my organization posts!


and my monthly tubs and centers (this one is a favorite!)...


AND, I've had a few questions about how I organize and display my Spelling Throughout the Year packs


So, here's what I do.

First, I print up the word wall words (both spelling and sight words) and cut them out to shape.
Then I glue them to their specific color. I chose teal for sight words and yellow for spelling.


Then I run those sheets through the laminator, and cut out the words again, but just in rectangles this time.


Now here's how I organize it all.


I print up the table of content sheets and put them in front. I just like to see where the skills are so it's a quick flip in the binder.


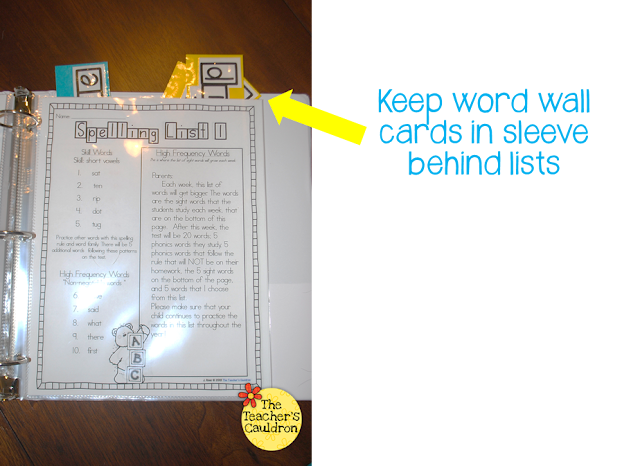
Then I put all the weeks together. For example...here's what week 1 looks like. I put the student list page up front, and then I put all the other sheets behind it in the same sleeve.


Keeping it all together makes it super easy when it's time to copy off for the week...I just take out the plastic sleeve and head up to the office to make my copies!


I even keep the word wall cards in the same sleeve (yes, you'll need a bigger binder by the end of the year!)


It keeps going like that for the rest of the binder....


Now, how do I display them?? Well, that's really up to you and your preference...or what you have available in your class. Here are some examples of how I do it.

Both the Spelling and Sight Words in one pocket chart.


Or, you can do one set per pocket chart, since depending on which pack you have, the words can get pretty big.


OR, you can do no pocket chart and just tape or magnet them to your chalkboard!


If you're interested, I have 3 different grade levels.

1st Grade                            2nd Grade                                3rd Grade

\

You can look for them at my 


P.s...make sure you come back tomorrow - I have a special surprise for you!!!

12

What we've been up to and a Video Tutorial: Re-sizing Clip Art

you know - it ALWAYS happens!

There are times when I don't really have anything to post and I RACK my brain trying to think of something to share with you...lol

and then other times??? I have SOOOO many ideas and thought to share, that I can't ever seem to get caught up....

But first, I wanted to say THANK YOU for all the love on my Monday Menu post yesterday :)

I'll be sure to show you another recipe next Monday.

Back to school.

So here's our writing we did on our first week back...

They had to write about their favorite memory, something they learned, and what they HOPE to learn in 2013, with a starter and closing sentence, of course. Then, we used the (only PART of) patterns I found from The Glyph Girls freebie - check it out HERE


In math, last week, we moved into learning about hundreds place

They are so good now that I give them a mystery number like this:

6+800+40
and they can tell me, without even thinking about it, that it is 846!

I'm super proud!!!

so, we've changed out the sheets in our Number of the Day folder that we do....


Check out my pack 


And we've been reviewing rounding - one of their centers has been my Rounding with Jack and Jill


Check out my pack 


Moving on to Reading centers....

This week is a review week, so for their word wall center, I wanted for them to do something different...

but first, I want to show you how well I'm keeping up with my word wall!!


I'm SOOO proud of myself!!

Over the summer, one of my goals was to work on my word wall...that was ALWAYS my weakest link. I sent out an S.O.S and so many blogging friends came to my rescue!!
Lori sent me a picture of her word wall, and I LOVED it, so I decided to go forth with it, and I love it!

My only problem is that since i don't have any wall space, I had to use the space under my wall, and I'm VERY QUICKLY running out of space... in fact, I HAVE run out of space for some of the letters...

So I think I'm going ot have to take some down, but I really don't want to because we refer to it ALL the time when we write....

Any suggestions?!??! I really am stumped...

Anyway, for one of their reading centers, I gave them graph paper, and they had to write the words, correctly with tails and hats (what do you call them??) taking up TWO boxes and the "shorts" taking up only one box. Then, outlining them like the words on are on the word wall. Apparently, this is a harder skill than I thought it was going to be, because I've had to have most of the ones who have done it already, redo it...lol


I'll do this again when we get to perimeter, so they can find the perimeter of the words. But we're not there yet.

And one of the other centers I wanted to share with you was a great find! It's from Michelle, over at Teach123 - it's her Arctic version of Read, Trace, Draw (check it out in my visual plans post)


I think I'm addicted to these now - haha! I might need them for all the "seasons."

and ONE last thing!

I had such great "reviews" from my last video - on how to insert your name on a picture for your blog, that I am doing another one for something I get asked a lot. 

HOW do you resize your clip art on your products so it doesn't look like this....


or this....


poor kitty - sorry Ashley!
(but thank you for making such a CUTE kitty!)

So here it is, a quick video tutorial on how to resize clip art - there are few different tricks I show you, so check it out, and let me know what you think!

Re-sizing the clip art to keep it from "squishing."


Want to see more techy posts?? go check out my girl Katie's Linky party!



9

Word Wall Linky - by Popular Demand!


Yay!! It's my first linky!!!

Everyone was chanting for a linky - lol..it's true.

After showing you my embarrassing "word wall" (er... cabinets, I mean)


I had some great ideas in the comments - and some were begging for ideas!

So, PLEASE link up -  not only do I want ideas, but I don't want to be a loser for my first linky! ha!!

Take your camera with you to work on Monday, take some pictures of your word wall - or whatever you use as one, and plan a word wall activity - your favorite - to show us!

If you're not in the classroom - like Mrs 3 AM - ahem! (since you love word walls!!) hehe...you can still write a post about it and link up!

I know we're all in "end of the year" mode, but a lot of us can use this to help plan for NEXT year!

Make sure to use my super cute picture - hehe..and then just make a link go to THIS post.

Also, when you link up, make sure to give the url of your Word Wall POST, not your whole blog.

Can't wait to see!!


22

A change of posts - help please!

Ok, y'all...this wasn't what I was going to originally post about - but I'll save that post for tomorrow...

I have a confession...

I hate word walls...lol.

Well, not really, I just don't ever use ours.  First off, I have no WALL to put them on, so I'd have to use my chalk/white boards. Ummm...kinda need that space for other things.  So I've started using my cabinet doors - it's "eye-ish" level (when they're sitting on the floor - ha!) for the kids to still be able to read, so I thought it would work....

Yeah....this is what it looks like - don't laugh - PLEASE! lol


I started the year off doing pretty well...but then I had an intern, went on maternity leave, and well, I just never thought about it again.

I've never been really good at using a word wall though. I admit it - it's one of my short comings.

So, I NEED your help!!!

WHAT can I do to make sure I use it next year? How can I make it more user-kid-friendly? What kind of activities do you do?? What words do you put up there?? Do you have a blogpost so I could see yours??!

(Should I just make this a linky???)

HELP!!!

Ok, now I must leave you with a smile - or two! :)

Today, it was nerd day at our school - since we are FINISHED with the FCAT testing!! 

This is the lady behind it all - she's one of my buddies - a 4th grade teacher. 


This super-nerd was JUST fabulous!!

(please don't judge our mess - we're seriously purging our stuff in our pod - and it's gotta get worse before it can get better, right?!)

And here is one of my kiddos - LOVE HIM!!!


And it's not a nerd, but B wanted to make you smile too! How could I NOT show you this picture?! :)


Hope y'all had a tremendous Thursday!
25
Back to Top